The MessageNet Blog
Get The Message Out!
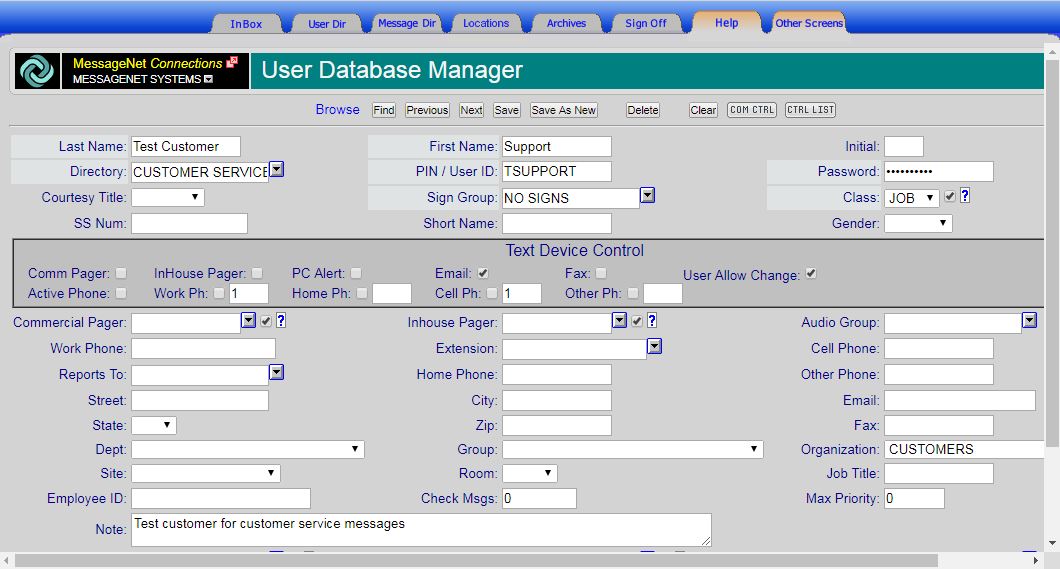
How to Set Up Text Device Control
Text Device Control is where a user can set up how they want to receive messages, independent of how a message is set up. For example, a user that wants to receive all messages via e-mail, regardless of whether the messages were configured to go to e-mail, can set this up in the Text Device Control screen. This screen appears in two locations (User Database Manager and Comm. Ctrl), but any changes made in one location will be saved in both locations. To access it, either click on the Comm. Ctrl. button in the upper right corner of the User Directory, or navigate to the User Database Manager from the Other Screens tab.

Each selection has a check box and corresponds to a device or communication method that can be added to a user’s account. To select devices on which to receive all messages, check the box next to the appropriate devices. Some devices, such as pagers (the name is pager, but it can really be any text device, including cell phones), must be checked in order for a user to receive any messages on it, even if a message is configured to send to that text device.
For phones, enter a 1 in the empty box next to the field’s check box. This number may differ depending on the organization’s phone system, but 1 is generally standard. The 1 instructs the system to bypass the voicemail message. This is important because the MessageNet system cannot tell the difference between a person answering the phone and voicemail picking up. If the voicemail picks up and plays its message before allowing a recording, the MessageNet system will have already played all or most of the message prior to the beginning of the recording. Entering a 1 bypasses the voicemail message so that the recording will begin as soon as the message begins playing.
Users can only change their own Text Device Control settings if the User Allow Change box is checked. This box is only in the User Database Manager version of the Text Device Control and the System Administrator must check it prior to the user changing their settings.
How to Create a New User
Creating and managing new users is the responsibility of the on-site System Administrator. For security reasons, MessageNet support staff cannot manage user accounts, as they have no way of knowing which users should have access to which features of the MessageNet system. Before creating a new user, the System Administrator should know what features of the system that user will need to use, so that the user account can be granted the appropriate permissions.
To create a new user, navigate to the User Database Manager from the Other Screens tab. Your own user record will appear as the default. The fields that are highlighted are the fields that are required to create a user account, but only the PIN/User ID field needs to be unique.
Erase the current contents of the Last Name, First Name, PIN/User ID, and Password fields and enter the correct information for the new user. Then, click Save as New. This will create a new entry (Save will override your own user account, so be careful). The PIN/User ID and Password fields will be used to log in to the MessageNet system and the First Name and Last Name fields will be used by messages and lists that the user will receive.
The other highlighted fields are Directory, Sign Group, and Class. In the Directory field, select the Message Directory that the user will be need most often. For some users, there is only one message directory that they use and they thus may not know how to navigate between directories. The directory selected here will be the default directory that appears when the users clicks on the Message Dir tab.
If the user has a sign that is dedicated to their use, then you can select the Sign Group for that sign so that other users can send messages to that user on their sign from the User Directory. Otherwise, this can be set to ‘No Signs’.
Class is the field that controls what kind of access and permissions a user will have to the MessageNet system. System Administrators will always need to be MGR-class users. Users who need to create messages will need to be at least CL1 (the highest level of standard user), while users who only need to send messages but not create them can be CL4 (the lowest level of standard user). To see a full list of possible user classes and what permissions they entail, click on the Help tab. Scroll down to the list of fields and select Class to quickly jump to the class descriptions. There will be a comprehensive description of each user class as well as a table of the different screens and which user classes have access to them.
Don’t forget to click Save after any further changes have been made.
School Shootings on the Rise
The 21st century has already seen more deaths and injuries in its first 18 years than in the entirety of the 20th century. At the time of writing, at least 13 separate incidents had occurred, causing at least 66 deaths and 81 injuries. In the 20th century, there were far more injuries, but only 55 deaths due to school shootings. The demographic of the shooters has also changed – now a school shooter is more likely to be an adolescent rather than an intruder. Researchers attributed the rise in school violence to a variety of factors, including easier access to guns for adolescents, mental health, and a lack of skills in conflict resolution.
Preventing more tragedies from happening should be a priority, but even with preventative measures in place, it’s vital to be prepared for the worst. A robust emergency communication system is more important than ever to protect staff and students and to save lives. During an emergency, one method of communication often isn’t enough to convey information to those who need it. Multiple methods of communication can provide different information to different groups of people at the same time, from teachers and students in different buildings to notifying parents and emergency responders.
Mass shootings aren’t exclusive to schools, either, and every organization should be prepared. There have also been more public shootings in recent years, including the one in Las Vegas. Having a plan for emergency situations and an emergency notification system to communication instructions to everyone involved is unfortunately necessary. In public locations, texts and other forms of private communication wouldn’t be able to reach most people, but audio/visual PA could still provide the necessary information and instructions. While improved communication can’t prevent emergencies from happening, it can help make the best of emergency situations when they occur.
How to Save Messages to Connections Mobile
There are two ways to save a message to your Connections Mobile app. If you have access to the Message Editor for a particular message, there is a Mobilize button at the top of the screen. Click that button to save the message to your mobile app. Note: some users may not have access to the message editor to use this method.

The second option is available to all users who have permission to launch messages. To save a message to the app, navigate to the Message Directory in which your message is saved and then right-click on the message name. A message will pop up for you to click that reads ‘Add to Connections Mobile.’
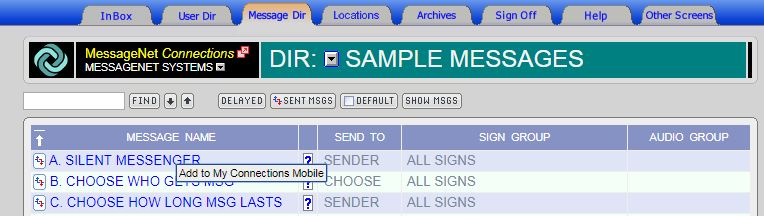
All messages added to the Connections Mobile app will appear in your DropBox and will need to be moved to a different section before they can be used or edited.
Getting Started with the Connections Mobile App
The Connections Mobile application is available on mobile devices and on computers. The app itself is currently only available for iOS, with an Android app still in development. Android devices can still access the Connections Mobile interface, but until the app version is released, access the app the same way as on a computer.
iOS:
To get started with Connections Mobile on Apple mobile devices, go to the App Store and search for msgnet to find our app, which will have the MessageNet logo as its icon. Download and then open the app on your device. When prompted, enter your MessageNet server’s IP (or node name), and select whether it uses HTTPS or not. If you do not know those details, then you should contact your MessageNet system’s administrator before continuing.
IMPORTANT CONNECTIVITY NOTE: If your server is only accessible on your organization’s local area network, then you will only be able to access it while connected to a Wi-Fi network that has access to that LAN. If you desire being able to remotely connect to your MessageNet system, then you will need to make sure your network provides an external port forwarding for port 80 to your MessageNet server; in which case, you would just configure your app with whatever external IP or domain name is applicable.
Once the App successfully connects to your network, you’ll be prompted to enter your MessageNet log in information. If your system allows it, the app can use automatic log in after you’ve logged in for the first time. The system administrator would need to set this up if it’s allowable without your organization’s security requirements.
Android:
The Connections Mobile App isn’t yet available for Android devices, but the Connections Mobile interface can be reached on any web browser just like on a computer. To open the Connections Mobile interface, open a web browser on your device and log in to MessageNet Connections the same way you would on a computer – just click the Connections Mobile button to log into the Mobile interface. Keep in mind that if you’re outside the network on which the MessageNet server resides, depending on your organization’s network and security settings, you may need to use an external IP address to access Connections Mobile. Consult your on-site MessageNet system administrator for more information if necessary.
PC/Mac:
You can access Connections Mobile the same way you can access the Connections Administrative Interface. Go to any web browser and enter the MessageNet server’s IP address into the browser bar. Click on the MessageNet logo to open the log in window (you may need to allow pop ups for the site) and enter your user name and password (if you are a new MessageNet user and don’t have these yet, consult your on-site MessageNet system administrator). Click on Connections Mobile to open the mobile app.
Connections Mobile is the same across all devices and any messages you save to the app will appear wherever you have logged in. Any changes you have made to the organization or to the messages will be saved to your account and will follow you from device to device. For ease of use, Connections Mobile looks the same, whether it’s opened on a mobile device or on a computer.
What Is Connections Mobile?
Connections Mobile is both a user interface and a mobile app, designed to be While some administrative tasks will have to be performed by the on-site system administrator in the Administrative Interface, Connections Mobile is designed to be the primary user interface for most users. The new interface is vastly simplified for ease of use and removes the need log in to the Administrative Interface for most regular users.
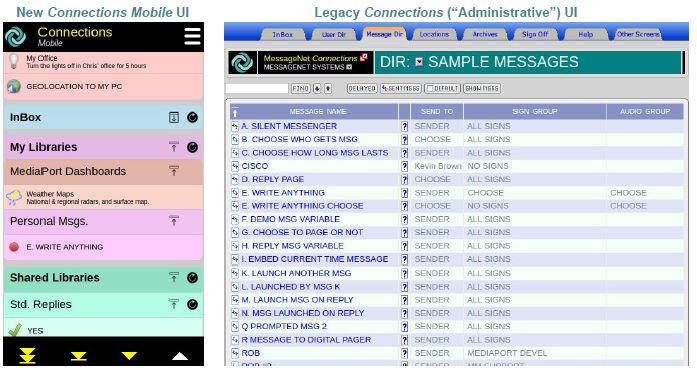
It’s available on computers, tablets, and smart phones and functions the exact same way regardless of the type of device you use. Messages saved to the app are tied to your user log in and so can follow you from device to device as you log in. Messages can be saved to Connections Mobile from within any message directory and can be then reorganized and edited by each individual user with their app without affecting the original message, allowing users to create their own custom interface that is accessible from any web browser.
There is an official app for iOS devices available in the App Store that can be downloaded and installed on Apple devices. For computers and Android devices, Connections Mobile is available from the web browser, accessible in the same way you were able to access the Administrative Interface. Logging in to Connections Mobile anywhere is as easy as selecting the Connections Mobile option when following the same steps you always have for logging in.
How to Set Up Remote Access to the MessageNet System
All of MessageNet support is done remotely, so it’s vital to maintain remote access to the MessageNet server for the MessageNet support staff and to keep them apprised of any changes with it that could affect access to the system. SSH access with a remote IP address is preferred, but a VPN is also acceptable. For security purposes, ssh remote access to the MessageNet server is limited, so any changes made to the network also need to be updated on the server by MessageNet support staff. If this change isn’t made, remote access to the user interface for all users will be broken until MessageNet staff update the remote IP address on the server. For VPNs, it can be time-consuming to make any changes and it’s best to test remote access with MessageNet support staff to ensure that it’s working as soon as the changes are made so that support tickets are not affected by a wait for VPN adjustments.
How to Set Up Message Archiving
One way to keep records of everything that happens in the MessageNet system is to set up messages to be saved to the Message Archives when they expire. Messages that are set to archive will later be viewable via their Archive Directory as well as by the sender and recipient of the message. If a message is not set to archive upon expire, then the message records will disappear after expiration and cannot be retrieved.
Note that while keeping records of messages can be important, launched messages are also recorded in the log files. Archiving allows you to organize saved messages any way your want, but the archives do take up space on your server, so it is important to decide which messages would be worth saving and which are not. If you need to create records of certain types of messages, setting up archiving is recommended.
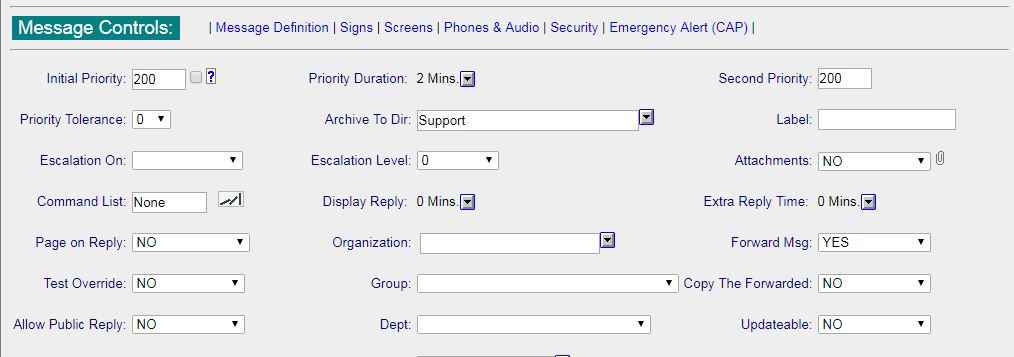
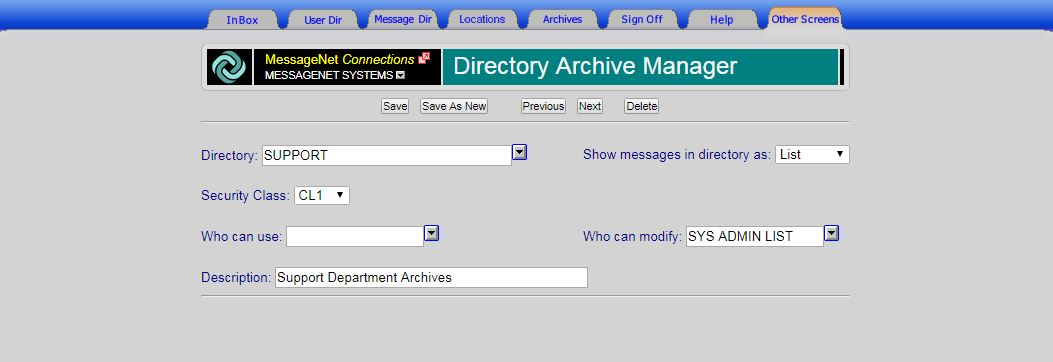
In the administrative interface, navigate to the Message Editor for the message you want to archive. Scroll down to the Message Controls section, or click on the Message Controls link at the top of the screen. Then, in the Archive to Directory field, enter the name of the Archive Directory that the message will be saved in. If that name already exists as an Archive Directory, the message will save to it upon expiration. If that name hasn’t yet been used for an Archive Directory, an Archive Directory with that name will be auto-created when the message expires for the first time.
Alternatively, you can create new Archive Directories from the Directory Archive Manager (available from the Other Screens tab). Keep in mind that if you create a new directory here, you will still need to add it to messages in the Message Editor in order to save messages to it.
How to Reset User Passwords
If you are a user of the MessageNet system but not the system administrator and have forgotten your MessageNet password, please contact your on-site system administrator for a password reset. For security reasons, MessageNet support staff are unable to manage users or reset passwords.
For on-site system administrators, to reset a user’s password, log in to the MessageNet Connections administrative interface, click on the Other Screens tab, and select User Database Manager. Your own user profile will appear as the default. To navigate to another user’s profile, you can click Browse and search through the full list of users, or you can enter the user’s surname into the Last Name field and click Find.
If there are multiple users with the same last name, you may need to click Next until you find the correct one. Once you are at the correct user profile, change the password, click Save, and then give the updated password to the user, who can then change it again if needed once they have successfully logged in.
How to Log In to MessageNet Connections
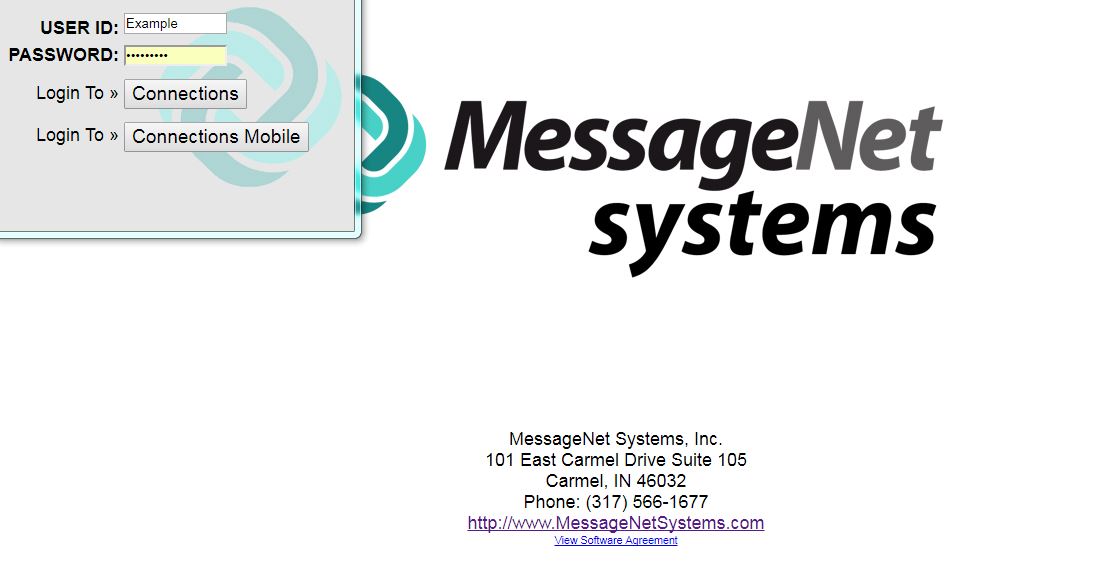
MessageNet Connections is browser-based on PCs and on Android devices (while the mobile app for Apple devices has been released, the Android version is still in progress, so a web browser must be used on Android devices until the app is released), so to log in, navigate to any web browser and enter the MessageNet server’s IP address (or dns host name, if your organization uses that instead). You may need to obtain this information from your on-site MessageNet system administrator. Once you have navigated to the log in screen, the MessageNet logo will appear.
Click anywhere on the logo and the sign in window will pop up. If it does not, you may need to allow pop ups from that address. Enter your user name and password into the appropriate text boxes. If you do not know your user name and password, check with your on-site system administrator. For security reasons, MessageNet support staff cannot manage user accounts or reset passwords.
To log in to the administrative interface, click the Connections button. To log in to the Connections Mobile user interface, click on the Connections Mobile button. Some web browsers offer the option to save your log in information so you don’t have to type it in every time. If you choose to do this, the button for Connections Mobile may appear grayed out. If this is the case, simply click in the password text box and the Connections Mobile button will become clickable.
 The MessageNet Connections software and licenses come with a no-risk, money-back guarantee. If you are unhappy with the software for any reason within 90 days of purchase, you may return the software for a full refund.